Posts

CyberWar Games 2015

Things I have learned from the CTF styled CYBER WAR GAMES 2015: Checking source code for getting some path that are not public and hidden information used Tamper Data to login into the website modified cookies values #cookies stealing from one user and hijacking the sessions Used Nmap to get the OS and services running in the targets and identified the vulnerable services nmap -A IP nmap -sV -O nmap -Pn Used Metaspolit to take the control of vulnerable and exploit the machine CVE -2014-0610 Open-SSL Heart Bleed used an exploit and got the servers password msfconsole, use, show options, set, exploit, search, show payloads Used smbclient application to connect the windows server from linux terminal smbclient '//10.1.8.136/c$'  -p445 --user='Administrator' mget to download files to local Used host application to get the IP address of the website or servers Used nslookup and dig to know the dns informations wget -r --no-parent

Python Speech recognition for Mac OS X

Hi Folks, I have been been searching for the    Python Speech recognition package especially for Mac OS.  I am not happy with the search results. Finally I got  https://pypi.python.org/pypi/SpeechRecognition/ (SpeechRecognition works only for the Linux distributions and Windows.) But I made it working for the Mac OS X by using flac.  Following are the instructions to make it run and modified code,  Prerequisite: Install Xcode in Unix Development mode Install Xcode - Command Line tools (Type ' xcode-select —install' in the terminal ) Install Port or Brew ( port    [or]   Brew   ) sudo brew install portaudio  [or]  sudo port install portaudio (for loading mic drivers) sudo pip install pyaudio [or] sudo easy_install install pyaudio (Mic Sources) sudo pip install SpeechRecognition [or] sudo easy_install install SpeechRecognition sudo port install flac Once you have finished with install, these are  mdfind flac | grep -i 'bin&#

Simple Automation using Python - Atomac in Mac OS X

Image
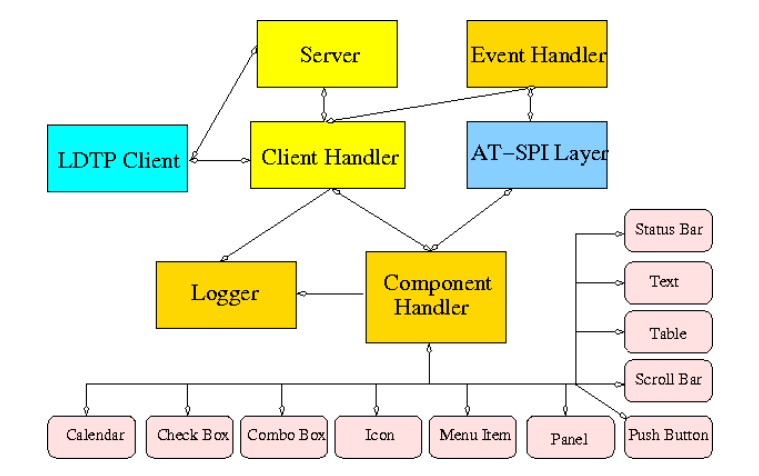
The Product Automation in MAC OS X is quite easy if we have enough knowledge in the following languages and tools  Bash Scripts  Apple Scripts  Python especially ATOMac Knowledge in Accessibility. For more understanding of the LDTP: http://download.freedesktop.org/ldtp/doc/ldtp-tutorial.pdf LDTP - Tutorial is written by  Nagappan Alagappan. He has given the clear idea and architecture of the LDTP and its working. I have used the contents from the tutorial for knowledge sharing. Following are the few information and contents from  the LDTP - Tutorial. Few interesting key points, Linux Desktop Testing Project (LDTP) i s aimed at producing high quality test automation framework and cutting-edge tools that can be used to test GNU/Linux Desktop and improve it.  It uses the Accessibility libraries to poke through the application's user interface.  This idea has been extended to Microsoft Windows as Cobra , Mac OS X as ATOMac .  LDTP is now known to wo

Using text to speech using Terminal + Python in Mac OS X

This post helps you to use 'say' command in python using 'say' command in python __author__ = 'vijay' # Run in Mac OS X import os import time lyrics1 = " we were meant to be" \ "like a destiny" \ "can you fill it our baby baby " \ "When you next to me " \ "I can never see " \ "anyone else but you baby " lyrics2 = " coz gonna believe that" \ "you sat them next to me " \ "yesterday I was facebook talking you" \ "now u sitting face to face with me" \ "simple close i just dont what to do" lyrics3 = " if you if you come to me baby i swear am gonna make you happy no no dont" \ " you worry you know that am ready ready You are you are my ice cream lady " \ "chocolate venila strawberry baby " \ &quo

Again Diamond ..

c=25; for i in {1..25}; do temp=$c; while [ $temp -gt 0 ]; do printf " "; temp=$(( temp - 1 )); done; j=$i; if [ $j -eq 1 ]; then printf "*"; else v=$(( j * 2 )); while [ $v -gt 0 ]; do printf "*"; v=$(( v - 1 )); done; fi; c=$(( c - 1 )); printf "\n"; done; v=1;a=25; while [ $a -gt 0 ]; do j=$(( 25 - a )); while [ $j -ge 0 ]; do printf " "; j=$(( j - 1 )); done; t=$(( a * 2 )); while [ $t -gt 0 ] ; do printf "*"; t=$(( t - 1)); done; a=$(( a - 1 )); if [ $a -eq -1 ] ; then printf "*"; fi; printf "\n"; done;

ip_classifier.py for ipv32

Written simple program to find the class for an ip address of 32bit version #!/usr/bin/python import sys, getopt def __help(): sys.stderr.write('\n Usage: \n ip_classifier.py -h \n ip_classifier.py --help \n ip_classifier.py -i 128.12.14.23 \n ip_classifier.py --ipv4=128.12.14.23 \n ') sys.exit() def __input_validator(check): if len(check) <> 0: check = list(check) c = 0; n = 0 for v in check: if v in ['.','1','2','3','4','5','6','7','8','9','0']: n += 1 test = True if v is '.': c += 1 else: test = False break if test and c < 4 and n > 6: return check else: sys.stderr.write('**** Enter correct ip address **** \n') __help() def __validator(ip): if ip in range(0,256): return True else: sys.stderr.write('**** Enter correct ip address **** \n') __help() def __class_finder(ip, class_ip, bin_

OSI Layer

Image

Subnetting Basics - Self Learn

Image
To understand IP address resolution, you need to understand how to decode the IP address and extract the two main identifiers: A network ID (the network bits) A host ID (the bits the system administrator controls locally when assigning IP addresses) Network ID is used to identify the number of  networks and Host ID is used to identify the number of hosts on the local-area network. For now, just keep in mind a few subnetting basics: A  subnet  mask — or  subnet  address — is used by routers to assist in determining the network portion of an IP address from the host portion. The  subnet  mask is a 32-bit value just like the IP address. The binary 1 bits correspond to the network and  subnet  portions of the address. The 0 bits are host representatives. Three standard masks exist for Class A, B, and C networks: Standard Class A   subnet  mask: 255.0.0.0 Standard Class B   subnet  mask: 255.255.0.0 Standard Class C   subnet  mask: 255.255.255.0

Network Addressing IPv4 - Self Learn

Image
Network Addressing: Each device on a TCP/IP (IPv4) network uses a unique 4-byte, or 32-bit, decimal IP address for communication and is composed of two distinct parts: a  network address  and a  host address. Each 8 byte is called octet. Example: 172.168.16.100 172 -> belongs class B 172.168. is the network address 16.100 is the host address Routing is done based on the network address. Each octet can have the value between 0-255. Classes of IP Addresses Two of the main ones are designated for the  default route  and  loopback address. The default route address is represented as 0.0.0.0 and is used to simplify the routing information that IP uses. Any route lookup failure defaults back to this route. The loopback address space is 127.0.0.0 and is used for testing and treating a local host as if it were remote to the network.  Class A (0–127): '0'  Class B (128–191):   '10' Class C (192–223):'110' Cl

Networking Basics - Self Study

Image
A common connection point for the devices  like computer, smartphones in the network  are due to the hubs, switches, repeaters and routers. Networking Components: Hub has multiple ports. When the frame arrives at one port, it broadcast the same message to all other ports. Hub does not check the destination address, it simply broadcast to all available ports. Hubs are less intelligent as it works on physical layer (L1) of OSI model it does not know the MAC address of the ports connected to the network. It lacks in security, so the attacker can sniff the neighbor packets. (Hubs are outdated) Hub can create lot of network traffic and lead to poor response times. Repeater is also similar to hub, but it is used to amplifies the input the signal. When input signal has both desired signal and noise along with it. Repeater regenerates the desired signal and noise signal will be eliminated. Repeater can be used in the situation where there is a long distance in transmissio

InCTF 2014 - Forensics-8 300

Given a partition needed to mount and get the flag. root@Vijay:~/Desktop/inctf 14/forensics# file Forensics-8 Forensics-8: x86 boot sector; partition 1: ID=0xc, starthead 0, startsector 1, 97656 sectors, code offset 0xb8 root@Vijay:~/Desktop/inctf 14/forensics# root@Vijay:~/Desktop/inctf 14/forensics# root@Vijay:~/Desktop/inctf 14/forensics# root@Vijay:~/Desktop/inctf 14/forensics# gparted Forensics-8 ====================== libparted : 2.3 ====================== root@Vijay:~/Desktop/inctf 14/forensics# parted Forensics-8 GNU Parted 2.3 Using /root/Desktop/inctf 14/forensics/Forensics-8 Welcome to GNU Parted! Type 'help' to view a list of commands. (parted) unit                                                             Unit?  [compact]? B                                                       (parted)                                                                 (parted) print                                                           Model:  (file) Disk